
Illuminate Your Space: Discover the Magic of In-Ground Lights and Transform Your Outdoors!
In-ground lights have surged in popularity as a key element of modern outdoor lighting solutions, bringing both aesthetic appeal and enhanced safety to homes and gardens. These fixtures, often embedded in walkways, patios, and landscaping, offer a seamless way to illuminate your outdoor space while maintaining an elegant, unobtrusive look. As more homeowners recognize the potential of outdoor lighting to transform their environments, understanding the different types of in-ground lights, their advantages, and installation methods becomes essential. In this article, we will explore the various types of in-ground lights available, the numerous benefits they provide, and a step-by-step guide to installing them effectively.
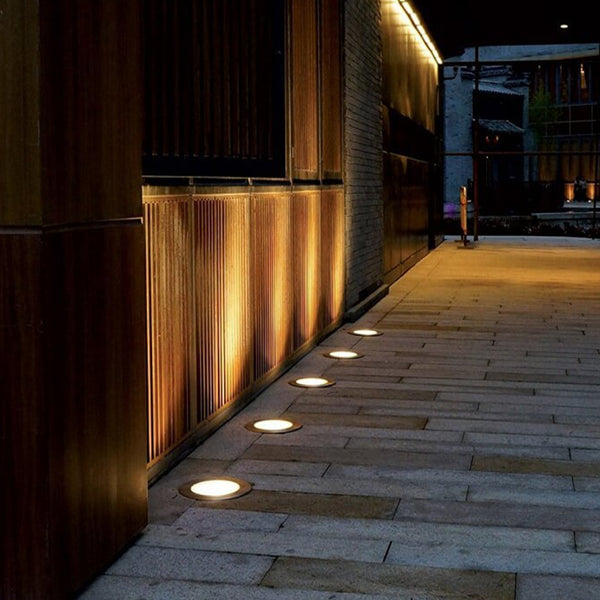
Types of In-Ground Lights
In-ground lights come in several varieties, each designed to meet specific needs and preferences. The most common types include LED, halogen, and solar lights, each with unique features and benefits. LED in-ground lights are renowned for their energy efficiency and longevity, making them an excellent choice for homeowners looking to reduce energy costs while enjoying bright illumination. They typically last up to 50,000 hours and emit minimal heat, which is a significant advantage for safety and durability.
Halogen in-ground lights, on the other hand, are known for their bright, white light that can enhance the beauty of landscaping features. They provide a warm glow, perfect for creating inviting atmospheres in outdoor entertaining areas. However, they consume more energy than their LED counterparts and have a shorter lifespan, making them less ideal for long-term use.
Solar in-ground lights offer a sustainable option for outdoor lighting. They harness solar energy during the day and illuminate the night without incurring electricity costs. These lights are particularly suitable for gardens and pathways where traditional wiring may not be feasible. However, their brightness can vary depending on the amount of sunlight they receive, and they may not be as powerful as LED or halogen lights.
When choosing the right type of in-ground lights, consider the specific needs of your outdoor space. For instance, if you’re lighting a walkway, LED lights would provide bright, energy-efficient illumination. If you’re looking to highlight a garden feature, halogen lights might be the way to go. Meanwhile, solar lights can beautifully light up areas with minimal infrastructure.
Advantages of In-Ground Lights
One of the primary advantages of in-ground lights is their ability to enhance safety around your home. By illuminating pathways, driveways, and steps, these lights help prevent accidents during nighttime, providing clear visibility for you and your guests. Safety was a major concern for my friend Lisa when she installed in-ground lights along her garden path. She shared how the added illumination not only made her evenings more enjoyable but also gave her peace of mind whenever her kids played outside after dark.
In-ground lights also significantly improve the aesthetics of outdoor spaces. They can highlight architectural features, accentuate landscapes, and create inviting atmospheres for outdoor gatherings. For instance, strategically placed in-ground lights can draw attention to beautiful trees or sculptures in a garden, creating a stunning visual impact at night.
Another notable advantage is energy efficiency. Many in-ground lights, particularly LED and solar options, consume less power compared to traditional lighting solutions. This efficiency not only reduces your energy bills but also lessens your environmental impact. Furthermore, the versatility in design allows homeowners to choose from various styles and finishes, ensuring that the lights complement the overall decor of their outdoor spaces.
Additionally, in-ground lights are incredibly versatile and can be used in various outdoor settings, from residential gardens to commercial properties. They can enhance patios, flower beds, and even swimming pool areas, providing ample lighting wherever needed. Their ability to blend seamlessly into the landscape makes them a popular choice for those seeking a polished and sophisticated outdoor look.
Installation Methods for In-Ground Lights
Installing in-ground lights can be a rewarding DIY project, but it requires careful planning and execution. Start by planning the layout of your lights. Consider where you need illumination the most, such as pathways or garden features. Once you have a clear plan, gather the necessary tools, including a shovel, wire cutters, and a voltage tester. Safety should always be your top priority—ensure you turn off the power supply before beginning any installation work.
The next step is to dig holes for each light fixture. The depth will vary depending on the type of light you choose, but generally, a depth of about 6-12 inches is sufficient. Make sure the holes are spaced evenly to create a uniform look. Once the holes are ready, install the fixtures according to the manufacturer's instructions, ensuring they are securely anchored.
Wiring is a crucial aspect of the installation process. If you're using hardwired lights, connect the fixtures to the power supply using outdoor-rated wiring. For solar lights, simply place them in direct sunlight, allowing them to charge during the day. After wiring, fill the holes with soil, taking care to leave the light's lens exposed. This not only helps the lights blend into the landscape but also allows for easy maintenance.
Finally, test each light to ensure they work correctly. Regular maintenance is essential for optimal performance, including cleaning the lenses and checking for any damaged wiring. With proper installation and care, in-ground lights will provide beauty and safety to your outdoor spaces for years to come.
Enhancing Outdoor Spaces with In-Ground Lighting
In-ground lights offer a unique and effective way to enhance the beauty and functionality of outdoor spaces. By understanding the different types available, the numerous advantages they provide, and the installation methods, homeowners can make informed decisions that will transform their environments. Whether for safety, aesthetic appeal, or energy efficiency, incorporating in-ground lighting can elevate your outdoor experience. Consider adding these fixtures to your home and enjoy the magical ambiance they create, lighting up your nights beautifully.